Bresenham 算法在进行直线的扫描转换时,由于不涉及浮点数运算,只是整数类型的运算,所以大大提高了计算速率。由于 Bresenham 算法精简、高效的特性,当前已经完全由硬件实现。这里就来了解算法背后的原理,尝试自己用GL_POINTS绘制一些图案
🚀 代码: Github
绘制点
因为下面所有操作都是通过绘制点来操作的,因此可以将这个操作简单地封装起来
首先定义两个函数,addPoint负责把点添加到顶点对象中,drawPoint负责把点绘制出来
1 | class Points: public Application { |
因为下面地所有操作都是整数运算的,而 OpenGL 默认渲染的坐标系是$[-1, 1]$的浮点数。因此还需要缩放一下坐标。
canvas_size定义了整个屏幕画布的大小,这里默认值为 100point_count表示当前缓冲区的点的数量vertices为当前整数顶点缓冲区finalVertices为最终的输出顶点缓冲区
为了优化性能,每次我们把所有点都计算出来加入整数缓冲区,最后才调用drawPoint将整数缓冲区转换为最终的顶点缓冲区调用OpenGL的函数将所有的点绘制出来
1 | void Points::drawPoint() { |
画一个三角形边框
原理
Bresenham 算法的一大特点就是可以完全不使用浮点运算,仅使用整数运算就可以绘制出一些图案。这里先尝试推导一下直线的 Bresenham 算法。
假设线段的两点为$(x_0, y_0)$和$(x_1, y_1)$,其满足$x_1-x_0>0$, $y_1-y_0 > 0$, 并且斜率$m$大于 0 小于 1。
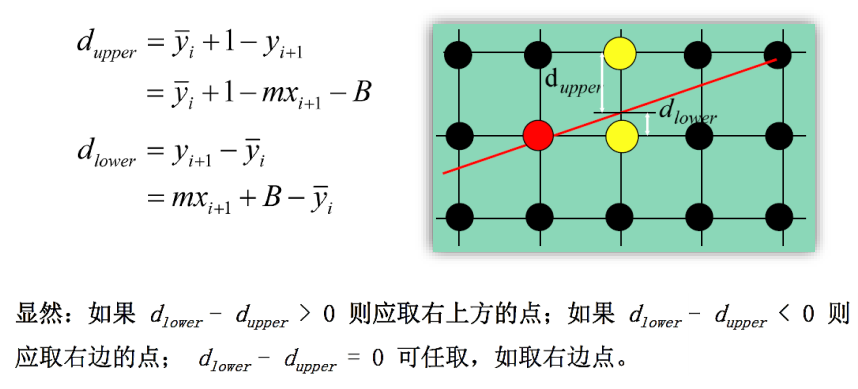
当前点为$(x_i, y_i)$,那么下一个点可以从$(x_i + 1, y_i)$和$(x_i + 1, y_i + 1)$这两点之间选择。
根据线段在$x_i + 1$的位置上的$y$值,我们可以选择其距离较小的一点作为下一点
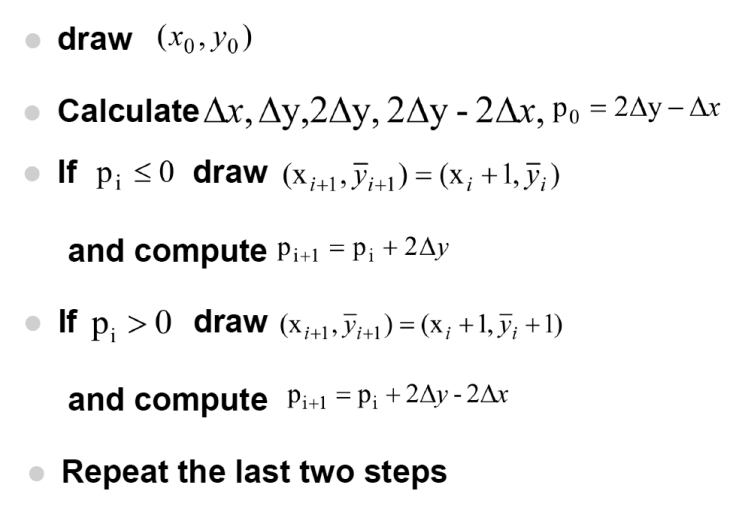
根据最终优化,可以得到以下算法
但是目前这个算法是只适应斜率大于 0 小于 1,并且满足$x_1-x_0>0$, $y_1-y_0 > 0$的情况,显然不能画出任意曲线,那么我们就需要自己变换一下。
实践
当斜率的绝对值大于 1 的时候,我们可以将 x 和 y 调换过来,就可以使得斜率的绝对值重新落在$[0, 1]$之间,最后在输出的时候再次把 x 和 y 交换过来输出。这样一来,斜率就可以控制在$[-1,1]$中
1 | // 处理斜率大于1 |
当$x_1-x_0<0$时,这个算法就不再是向右移动绘制,因此这种情况我们需要将线段的两个点调换过来。
1 | // 处理反方向 |
经过上面两层处理之后,我们发现依然不满足$y_1-y_0 > 0$这个条件,我们可以改进一下算法,当斜率为负数的时候就将 y 的增长调整为递减。
1 | // 处理斜率为负数 |
综合以上条件和算法,最终的出来的核心代码如下:
1 | void Points::calcLine(int start_x, int start_y, int end_x, int end_y) { |
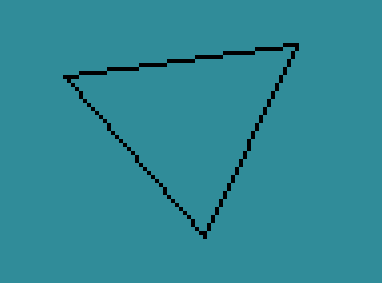
根据三角形的三个点,调用以上算法 3 次,画出三条直线,就可以得到一个三角形边框
1 | // 初始化三角形顶点 |
为了显示出 Bresenham 的效果,这里使用$[-100, 100]$为基准坐标,显示结果如下:
画一个圆
原理
有了上面画三角形的经验之后,我们可以根据类似的算法画出一个圆。
根据圆的特点,我们只需要画出$\frac{1}{8}$的圆弧,根据对称翻转,就可以绘制出一整个圆来
首先,我们根据中点画圆法推算一下公式
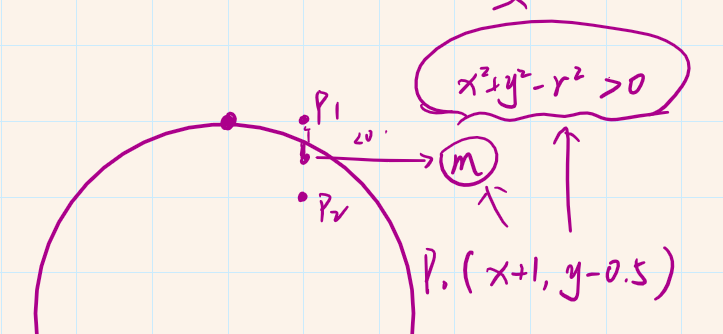
首先,第一个点选取圆的正上方$(0, r)$作为$(x_0, y_0)$,通过判断$(x_i + 1, y_i)$和$(x_i + 1, y_i - 1)$的中点是否在圆中,如果在圆中,那么就选择下面的点,否则就选择上面的点。而判断这个点是否在圆中可以把中点$(x_i+1, y_i - 0.5)$代入圆的公式来看结果是否小于 0。
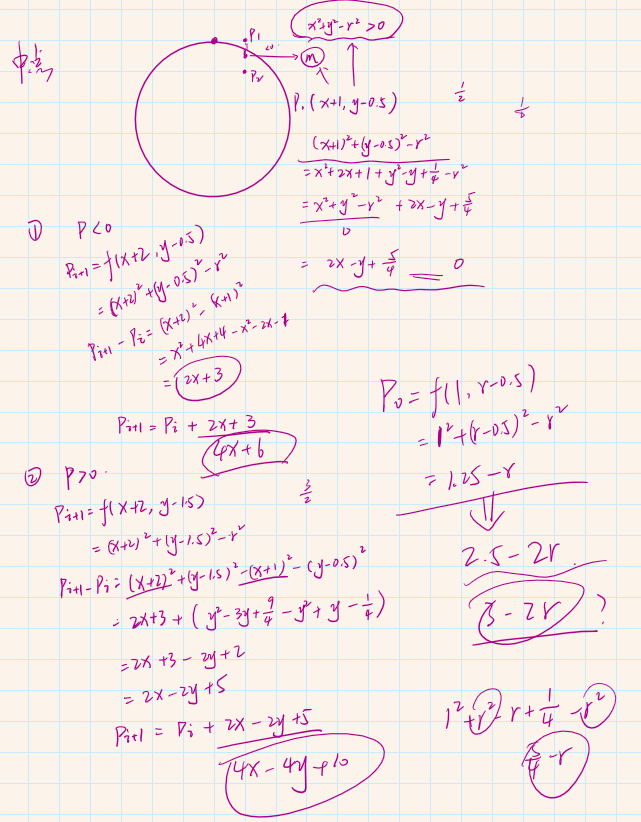
最后根据 Bresenham 算法的递推方法,推算出当 P 大于 0 或者小于 0 两种更新方法。然后算出第一个点$P_0$为$1.25-r$,为了避免浮点数的运算,我们把所有的结果扩大两倍。再限制圆形半径不得小于 2,$P_0$就可以近似为$3 - 2r$
实践
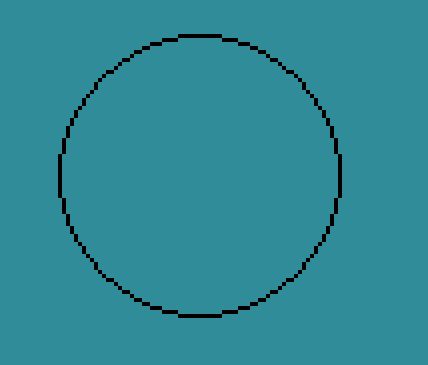
最后根据对称原理,得到以下的代码
1 | void Points::calcCircle(int cx, int cy, int r) { |
渲染得到以下结果
GUI 控制绘画参数
和之前的一样,这里使用ImGUI来实现控制台,控制一系列的绘制参数。
具体的用法可以参照他的 Demo,这里使用Slider滑动条来控制绘制参数,可以更好地控制渲染范围。
1 | void Points::render() { |
通过调节三角形三个顶点的位置来控制三角形的绘制:
通过控制圆形位置和半径大小来绘制圆
三角形光栅转换算法
原理
三角形的光栅化有多种算法,这里使用 Edge Equations 算法来实现光栅化
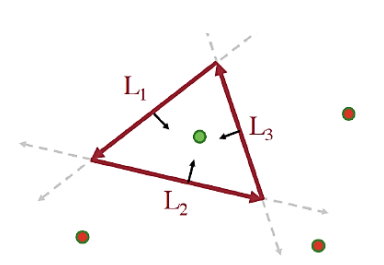
这个算法的核心就在于算出三角形三条边的直线方程,然后判断点是否再三角形的内部然后决定是否对其进行填充。
直线方程可以使用直线的两点式来求出$Ax+By+C$中的 ABC 参数
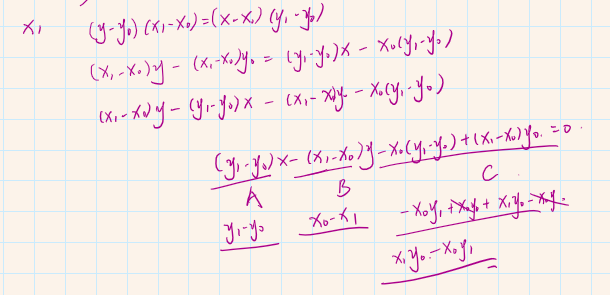
然后,我们需要对直线进行中心化,确保三角形内所有点代入结果都是为正,这个可以通过把三角形的第三个点代入当前直线,如果结果为负数那么就把 ABC 参数全部取反。
确定了直线方程之后,还需要找出所需要遍历的点,这就要找出三角形的一个 bounding box

这里就简单的根据三个点找出其 x 和 y 的最大值和最小值,构成一个矩形,然后对这个矩形里面的所有点进行判断。
实践
根据上面的原理,可以得到以下代码
1 | void Points::calcTriangle() { |
最后得到以下结果,通过调节绘制的点的大小,可以清晰地看见三角形内部完全是由点来填充的
结语
如果还有不太明白的地方可以到 这里 查看完整的代码。
通过这次学习,了解了 Bresenham 算法的美妙之处,这是计算机图形学中的一个非常重要的算法,极大了优化了计算的效率。至于三角形的光栅化其实还有 Edge Walking 等其他算法,这里只是介绍了其中的一种比较简单的算法,不过根据这个算法已经可以扩展出非常多的用法。
这些算法都是图形学的基础,虽然现在我们不需要自己实现这些算法,这些算法早已经集成在硬件层面了,但是这种思想可以扩展到很多地方去。